Manually Enter Bootloader Mode
Last Updated: Mar 07, 2024
This post explains how to manually enter bootloader mode and flash calibration scripts and firmware to your MBot.
These instructions serve as an alternative to “MBot System Setup -> Set Up MBot Firmware -> 2. Calibrate the MBot and Flash the Firmware.”
Use the method described here only if the one in the system setup post is unsuccessful.
There are 2 ways to manually enter the bootloader mode (namely let the pico ready to receive the scripts), you only need to pick one to implement!
Method #1 RST button + BOOTSEL button (Recommended)
- Initiate a remote connection with VSCode.
- Enter bootloader mode
- Press hold RST button and then press hold BOOTSEL button (you are pressing 2 buttons now).
- Let go RST button while still pressing BOOTSEL (you are pressing 1 button now).
- Let go BOOTSEL.
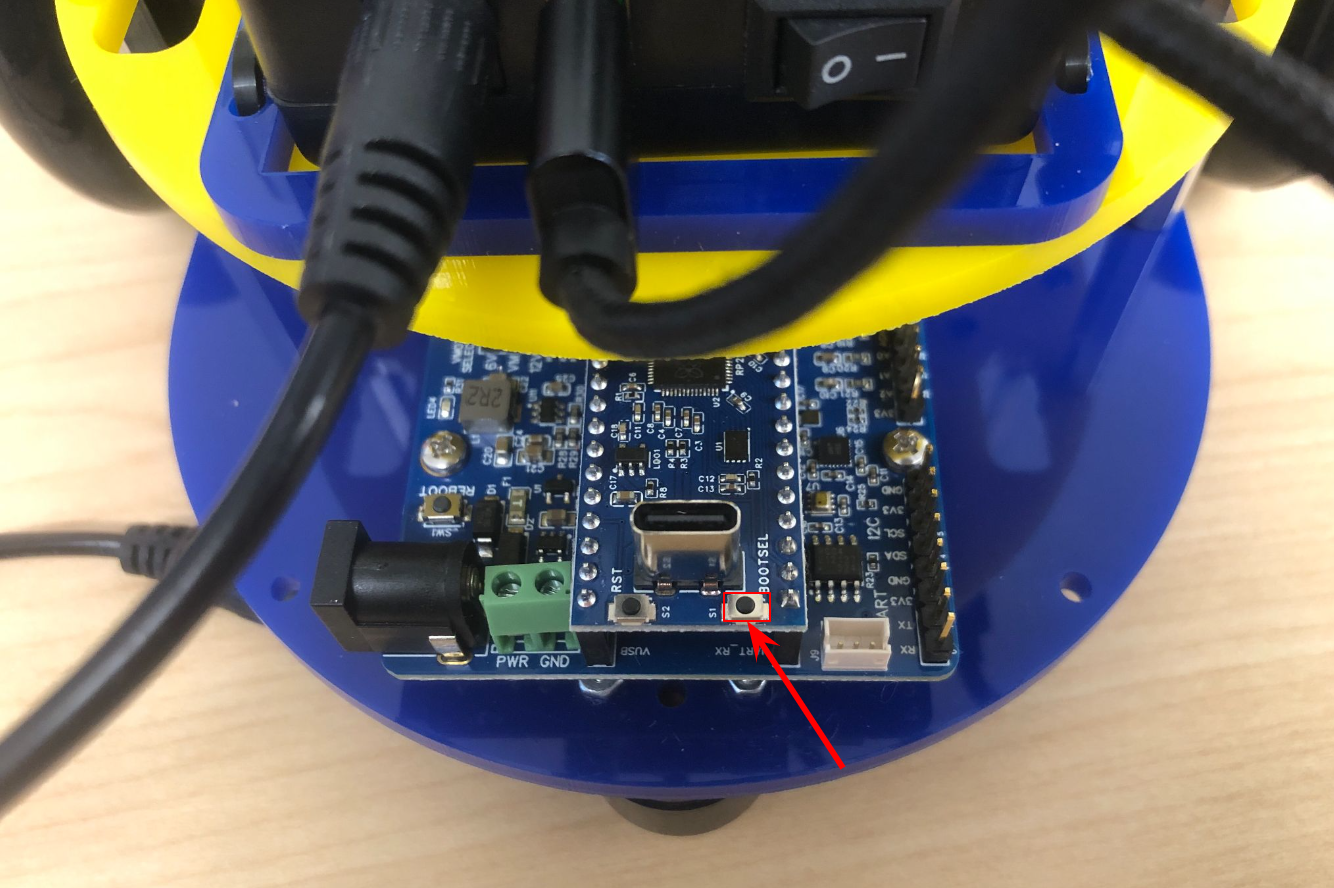
The BOOTSEL button is indicated in the image, with the RST button located on the opposite side of the Type-C socket.
Now your pico is in the bootloader mode, you can flash the .uf2 file to it now.
- The calibration script,
mbot_firmware/build/tests/mbot_calibrate_classic.uf2 - The MBot firmware,
mbot_firmware/build/src/mbot.uf2
- Upload the calibration file by the following commands:
$ cd ~/mbot_ws/mbot_firmware $ sudo picotool load build/tests/mbot_calibrate_classic.uf2 - Place the MBot on the floor in a spot with at least 2 feet of clear space all around the robot.
$ sudo picotool reboot- The Pico will reboot automatically, and will then run its calibration routine. Allow the Pico to finish its calibration routine without interference.
The calibration script will have saved parameters onto the Pico’s memory. We can now flash the firmware that will run on the Pico during operation.
Repeat the step 2 above to put the Pico to bootloader mode, then run
$ cd ~/mbot_ws/mbot_firmware
$ sudo picotool load build/src/mbot.uf2
$ sudo picotool reboot
Method #2 Disconnect the power
- Initiate a remote connection with VSCode.
- Temporarily disconnect the Control Board by removing both the battery’s barrel plug and USB-C while keeping the Jetson powered on. Ensure no cables are connected to the Control Board.
-
Enter the Pico bootloader mode (BOOTSEL mode) in the following order: press and hold the BOOTSEL button on the board; reconnect the USB-C to Pico (while holding down the BOOTSEL button); release the button; and finally, reconnect the power barrel plug.
- Upload the calibration file by entering the following commands:
$ cd ~/mbot_ws/mbot_firmware $ sudo picotool load build/tests/mbot_calibrate_classic.uf2 - Place the MBot on the floor in a spot with at least 2 feet of clear space all around the robot.
$ sudo picotool reboot - The Pico will reboot automatically, and will then run its calibration routine. Allow the Pico to finish its calibration routine without interference.
The calibration script will have saved parameters onto the Pico’s memory. We can now flash the firmware that will run on the Pico during operation.
- Repeat the step 2 and 3 above to put the Pico to bootloader mode, but this time run
$ cd ~/mbot_ws/mbot_firmware
$ sudo picotool load build/src/mbot.uf2
$ sudo picotool reboot