Checkpoint 3
Last Updated: Feb 26, 2024
In this part, we will first build a block detector, then implement inverse kinematics, and eventually achieve a click-to-grab level of autonomy where you can click on the control station and the arm will pick up the block you clicked on.
Contents
Block Detector
Intro
The block detector’s task is to identify blocks based on their shape, size, color, and orientation.
You can take many approaches to detect the blocks’ shapes, colors, and orientations. The most reliable of the approaches is to utilize the depth image and the RGB image from the RGB-D camera separately, use the depth image to detect the geometry and use the RGB image to detect the color of the block.
Using OpenCV is a good starting point. To evaluate your block detector implementation, use the sample images in the armlab_opencv_examples repository or gather images from your workspace.
Task 3.1 Block Detector
Implement a block detector capable of detecting red, orange, yellow, green, blue, and purple blocks and determining their location in the workspace. We recommend you develop a standalone program based on the OpenCV and Python tutorial first. Afterward, integrate these functions into the Camera class in camera.py.
1) Describe the methods you used to implement the block detection and any strategies you implemented to limit false positive detections and enhance the robustness of the detector
2) Describe how you verified the accuracy of your block detector and provide evidence of its performance. Create a plot that communicates this information (for example: visualize the uncertainty vs. location on the board using a heatmap).
Inverse Kinematics
For this checkpoint, you will work on implementing the Inverse Kinematics to determine the joint positions required to move the end effector to a location in the global frame.
Intro
The inverse kinematics function you implement will output the necessary joint angles to move the end effector to a desired position and orientation.
You are free to use any representation of orientation you wish (ZYZ Euler angles, Roll-Pitch-Yaw, etc.).
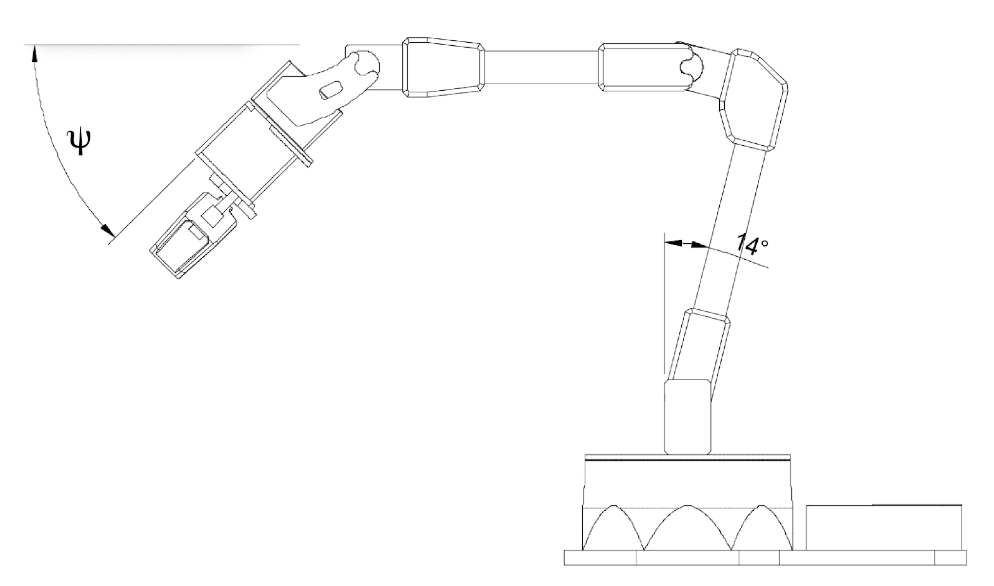
In kinematics.py, the code is set up for a simplified IK function that takes a single orientation angle \(\psi\), defined as the angle from the horizontal plane or the rotation about the z-axis in frame 1, as shown in the figure below. You do not need to use this definition, but it is convenient and is a good starting point for your IK function.
Task 3.2 Inverse Kinematics
Implement an inverse kinematics function that returns the joint angles that reach a position in the workspace. This function should return error messages if the specified end effector configuration is not reachable, and it should be able to handle degenerate poses.
1) Include a schematic diagram of the arm with all relevant FK and IK parameters
2) Precisely specify the IK function by writing the equations, explaining them, and referencing the source file and lines
Click to Grab/Drop
Intro
After completing the FK and IK implementation and testing, you can now work toward grabbing a block that is within the reachable space of the RX200. This can be done using a click-to-grab & click-to-drop setup.
A simplified process may look like the following:
- After launching the GUI, calibrate the camera using the button you created on the GUI
- Ensure the calibration works by moving the cursor around on the video stream on the GUI and reading the global position output
- Left click on a position in the frame within the reachable area of the RX200 arm. The arm should then be able to move the end effector to that global position and close the gripper
- Left click again on another position in the frame that is within the reachable area of the RX200 arm to drop whatever was grabbed in the previous step
This is a test to ensure that the kinematics you implemented in kinematics.py work and are capable of computing the correct joint positions to move the end effector to a desired position.
Task 3.3 Click-to-grab/click-to-place
Implement click-to-grab/click-to-place such that you can click on a block in the video frame, and the arm will move to the grasp location; then, a second click will tell the arm to move to a drop-off location. Initially, you only need to implement this for blocks on the ground plane because it will help tune performance for the competition later.
Consider to implement:
- The arm joints will load down due to gravity, make sure to “approach” the goal points from above and move slowly down. Calculating a reasonable vertical offset will be helpful.
Describe the algorithm you used to create and execute the RX200 arm motion plan.
Checkpoint Submission
Part 1
- Record a video demonstrating click to grab & click to place. (Please show the view of control station gui as well as real world view in your video)
Part 2
- Record a video demonstrating your block detection system. Identify at least the large red, green, and blue blocks.