armlab_xl320_lib Guide
Last Updated: Oct 02, 2024
This guide introduces how to manuver the XL320 servo using the
armlab_xl320_librarycode example provided.
Contents
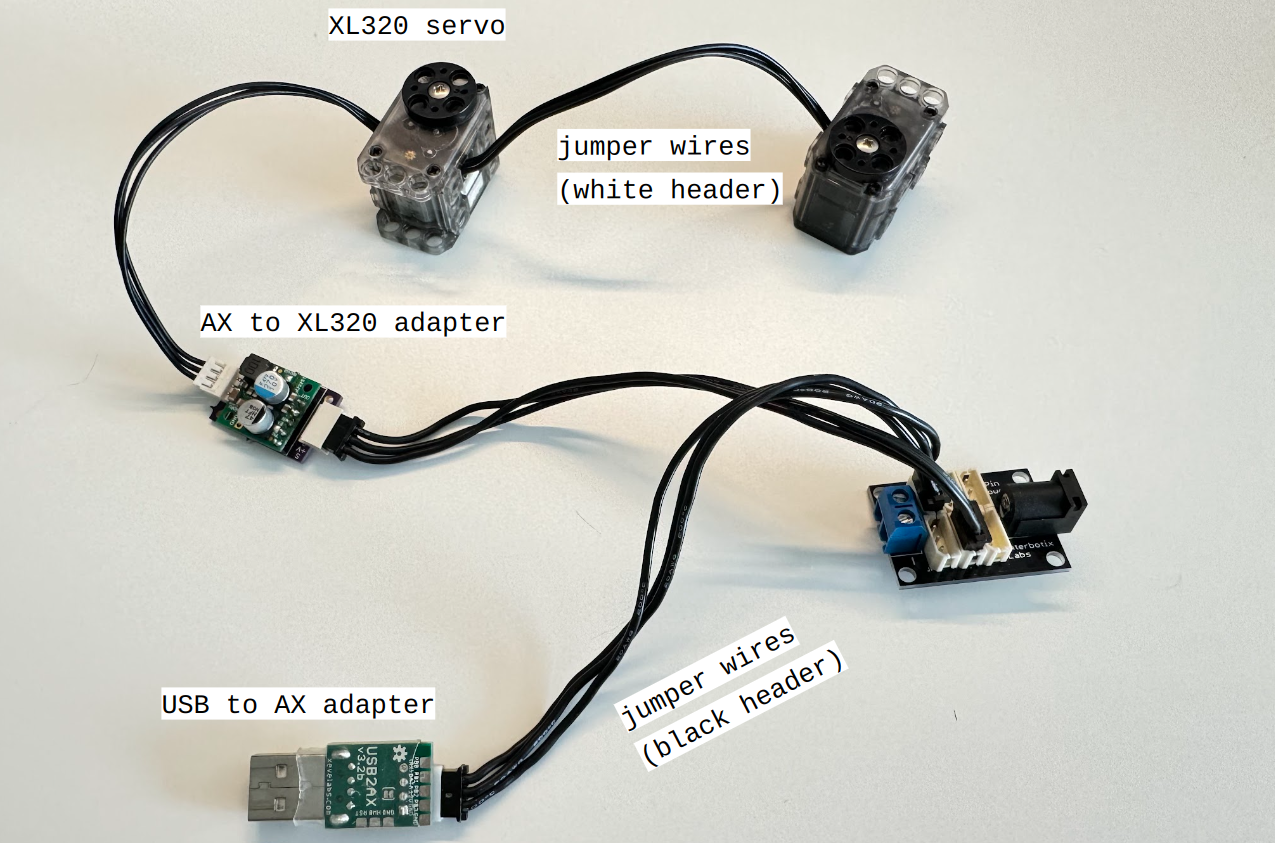
Assembly
Components:
- USB to AX adapter
- AX to XL320 adapter
- XL320 servo
- jumper wires with black header
- jumper wires with white header
Instructions:
- Gather all the components listed above.
- Assemble them as shown in the image below.
- Note: The rightmost board in the image is the Interbotix hub, which is used to power the setup. This hub is located inside the base of your RX200 arm, where you plug in the power cable.
Preparation
1. Download “Dynamixel Wizard 2.0”
Using Dynamixel Wizard, you can change the servo’s ID, check the port name, and make many other adjustments.
- Download Dynamixel Wizard 2.0 onto the lab’s laptop if “Dynamixel Wizard” is not already installed.
- Then plug the USB into the laptop and open the Dynamixel Wizard.
- Click “Scan”: the application will begin scanning for any connected servos. This process may take some time.
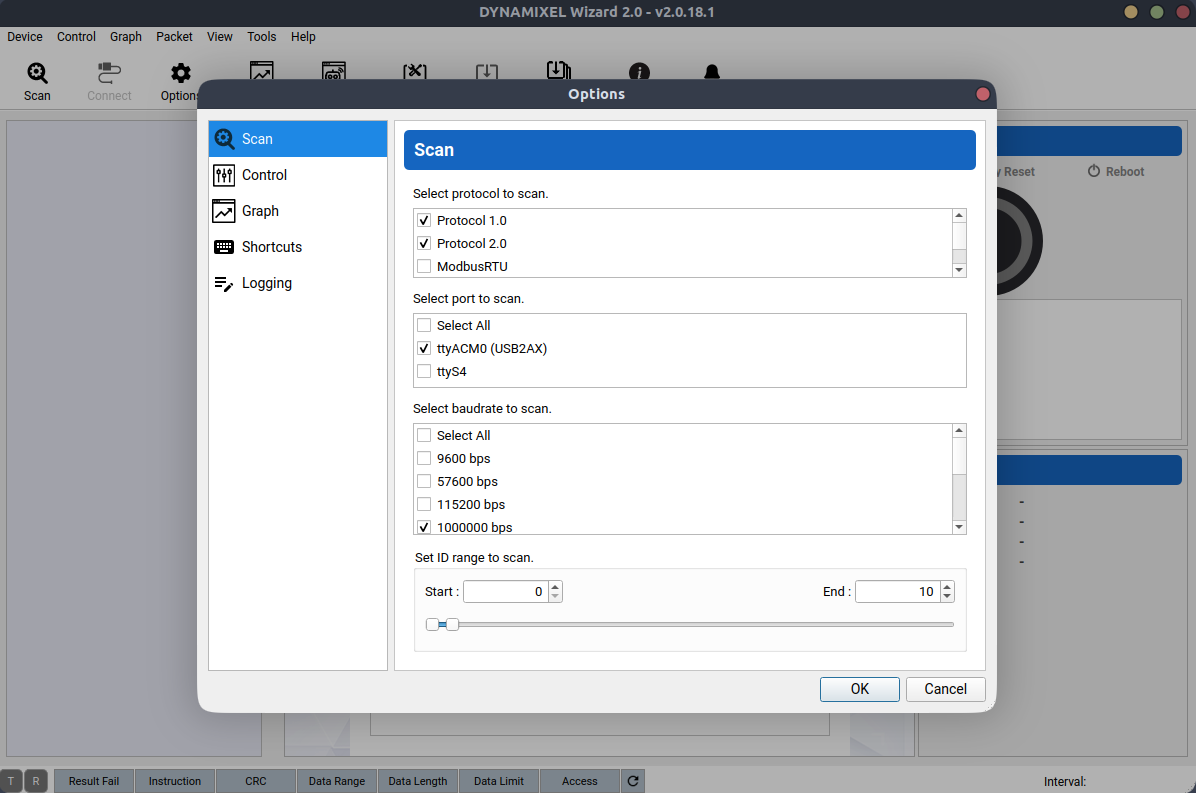
- Click “Options”: a window will appear as shown below, where you can deselect some options to speed up the scanning process. For instance, you can narrow the ID range, choose the default baud rate, and select only Protocol 2.0 since the XL320 uses Protocol 2.0.

2. Check your servo’s ID
You will need to specify your servo’s ID when using the XL320 library we provide. To check your servo’s current ID or change it to a preferred number, use Dynamixel Wizard.
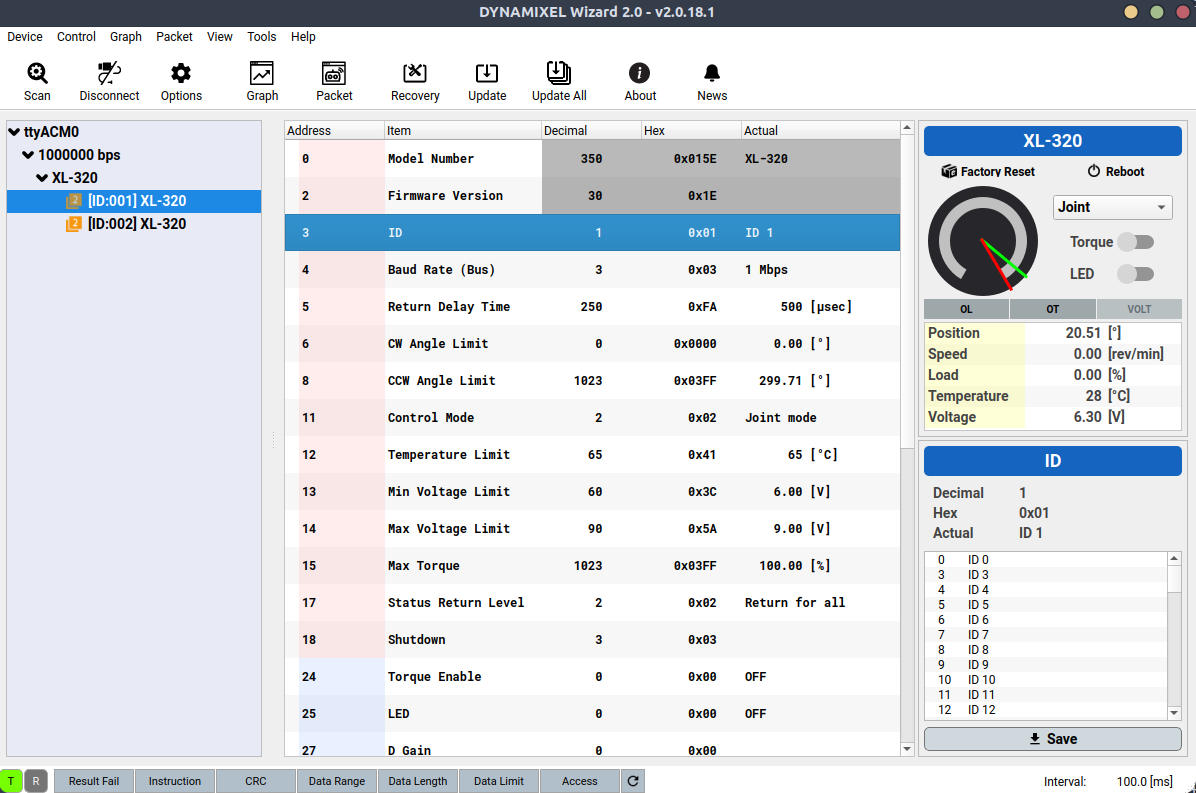
In the image below, you can see two servos: one with ID 1 and the other with ID 2. For this step, that’s all the information you need.
If you wish to change these IDs:
- Click on the corresponding servo.
- In the right-side panel, select your preferred ID.
- Click Save to apply the new ID.
Tip: If you’re unsure which servo corresponds to each ID, you can identify them by toggling the LED switch on and off. This will help you visually confirm which servo you are configuring.
After confirming your servo’s ID, you can quit Dynamixel Wizard.
3. Check the port name
You will need to specify your port name when using the XL320 library we provide because USB port names are dynamic.
When USB is plugged into the laptop, run:
$ sudo dmesg | grep tty
This command shows kernel messages related to tty devices and filters the output for the string “tty”. Look for lines that mention a new device being attached. The device will usually be listed as /dev/ttyUSB0, /dev/ttyACM0, or similar.
For instance, the output might include a line similar to:
[ 8263.926975] cdc_acm 1-9:1.0: ttyACM0: USB ACM device
Here, the port name is /dev/ttyACM0.
4. Clone the codebase
Run the following commands to install the xl320 library
$ git clone https://gitlab.eecs.umich.edu/ROB550-F24/armlab_xl320_library
$ cd armlab_xl320_library
$ ./install.sh
Codebase
Now the library is ready to use. There are two python scripts under /examples for reference.
$ sudo python3 rotate_in_circle.py
# and
$ sudo python3 rotate_full_range.py
To run the examples, you need to modify some of the variables to suit your specific setup:
PORT_NAME = "/dev/ttyACM0"  # USB port names are dynamic you need to check what it is
#...
# defines the servo's ID
servo1_ID = 1
servo2_ID = 2
Demo
Uninstall
To uninstall, run:
$ sudo python3 -m pip uninstall -y armlab_xl320_library dynamixel_sdk
After uninstalling, if you want to remove the folder, run:
$ sudo rm -rf armlab_xl320_library
- Please do not uninstall it directly by
sudo rm -rf armlab_xl320_librarywithout pip uninstall first, this will cause error when you re-install it.
Troubleshooting
If you have errors saying:
"[RxPacketError] Hardware error occurred. Check the error at Control Table (Hardware Error Status)!"
"[TxRxResult] There is no status packet!"
There could be many reasons behind this issue. If everything still functions but you continue to see these errors, try unplugging and then replugging the wires to ensure all connections are secure.

