Software
Last Updated: Sep 02, 2026
This page describes the codebase you will be working in: what each file does, how the pieces talk to each other, and which functions are yours to write. Everything runs as plain Python inside the
env550labconda environment. There is no ROS in this lab.
Contents
- Contents
- Architecture
- Two ways to run
- Repository layout
- Units and conventions
lite6arm.py: the real armlite6arm_sim.py: the simulated armcamera.py: perceptionstate_machine.py: behaviorkinematics.py: the math- The control station GUI
- What you implement
- Running pieces on their own
- Environment notes
- Reference
Architecture
The control station is a single PyQt5 process with three background worker threads. Nothing is distributed, and there is no message bus between them: they share Python objects and communicate with Qt signals.
| Thread | Rate | Job |
|---|---|---|
VideoThread | 30 Hz | Pulls aligned color + depth frames from the RealSense, runs the depth filters and AprilTag detection, emits four QImages |
ArmThread | 20 Hz | Polls joint angles from the arm; emits the end-effector pose every other tick (10 Hz) |
StateMachineThread | 20 Hz | Calls StateMachine.run() in a loop and emits the status message |
The GUI thread owns the widgets and does nothing else. Each worker emits Qt signals that the GUI receives as slots, which is what keeps the interface responsive while the arm is moving.
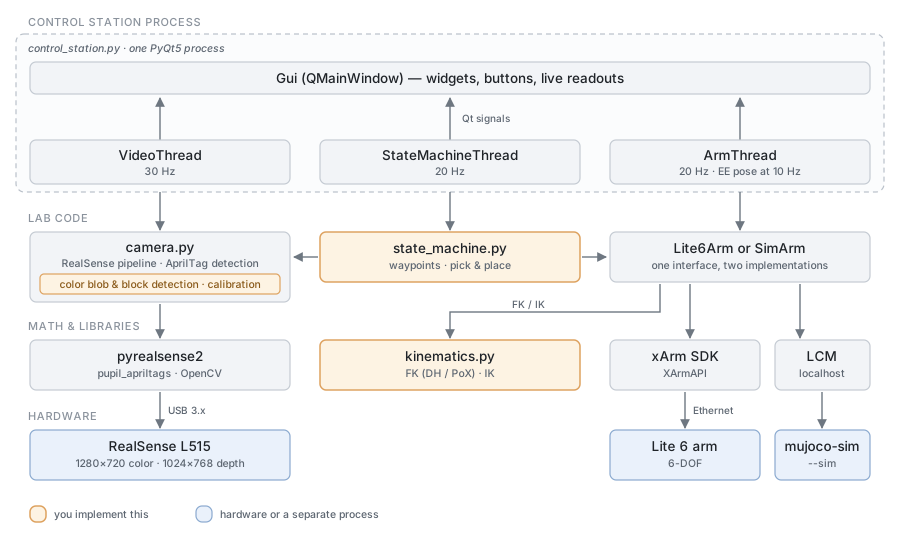
Arrows show who calls whom. Not drawn, to keep the picture readable: the GUI also calls into the state machine and the arm object directly from its button handlers: set_next_state(), open_gripper() and friends.
Two ways to run
control_station.py takes a mutually exclusive pair of flags:
cd src
python control_station.py          # --real is the default: talks to the arm hardware
python control_station.py --sim    # talks to the MuJoCo simulation over LCM
In --sim mode you must start the simulator first, in its own terminal:
mujoco-sim
The switch happens in one line of control_station.py:
self.arm = SimArm() if arm_mode == "sim" else Lite6Arm()
SimArm and Lite6Arm expose the same public API. The GUI and the state machine never check which one they have. That is the central design decision in this codebase: your state machine code works against either, so you can develop logic in simulation and run it on hardware without changing a line.
control_station.py imports both camera and lite6arm at module scope, so the full stack has to be installed even to run in simulation.
Repository layout
| Path | What it is |
|---|---|
src/control_station.py | PyQt5 GUI, thread wiring, and all the button handlers |
src/lite6arm.py | Lite6Arm, the real arm, wrapping the xArm Python SDK |
src/lite6arm_sim.py | SimArm, same public API, talks to the MuJoCo bridge over LCM |
src/kinematics.py | Student lab. FK (DH and PoX), IK_geometric, IK_numerical |
src/camera.py | RealSense L515 pipeline, AprilTag detection, student extrinsic calibration |
src/state_machine.py | Student lab. The state machine behind the GUI’s action buttons |
src/ui/layout.py | Widget layout. Generated-style code; you should rarely need to edit it |
src/ui/style.py | Qt stylesheet |
src/mujoco_sim/ | The simulation bridge, vendored from arc-bridge and trimmed to the Lite 6. Has its own README. Treat it as a library, not as lab code |
install_scripts/ | The three setup scripts, documented in the setup guide |
Units and conventions
Internally this codebase is radians and millimeters. The arm object is constructed as XArmAPI(ip, is_radian=True), so every angle crossing the SDK boundary is in radians, even though the SDK’s own default is degrees. Degrees appear only in GUI labels, where np.degrees() is applied at the last moment.
| Quantity | Unit |
|---|---|
| Joint angles | radians |
Positions (x, y, z) | millimeters |
Orientation (roll, pitch, yaw) | radians |
| Joint limits | radians |
DH table d and a | millimeters |
DH theta_offset and alpha | radians |
The pose vector used everywhere, for FK output, IK input and the GUI readout, is:
[x, y, z, roll, pitch, yaw] # mm, mm, mm, rad, rad, rad
Orientation is roll-pitch-yaw about fixed X, Y, Z axes, matching the xArm SDK convention.
The six joints are named Base, Shoulder, Elbow, F.Roll, W.Pitch, W.Roll (JOINT_NAMES in lite6arm.py).
lite6arm.py: the real arm
A thin wrapper over XArmAPI. Construction connects, enables motion and puts the arm in position mode; if that fails it prints a warning and sets connected = False rather than crashing, so the GUI still opens with the arm offline.
Two flags gate almost everything: connected (the SDK object exists) and initialized (the arm has been homed via initialize()).
The wrapper drives the arm through four xArm firmware modes:
| Method | Firmware mode | Used by |
|---|---|---|
enable() | 0, position | Normal point-to-point moves |
enter_jog_mode() / start_jog() | 4, joint velocity | The Direct Control jog buttons |
enter_cartesian_jog_mode() / start_cartesian_jog() | 5, Cartesian velocity | The Cartesian Jog buttons |
set_teach_mode(True) | 2, joint teaching | The Manual Mode toggle (free-drive) |
Cartesian jog is capped at 150 mm/s linear and 1.0 rad/s angular, scaled by the speed slider.
initialize() also switches on self-collision detection and sets collision sensitivity to 5, then drives to Q_DEFAULT, the same home pose UFactory Studio uses, and the seed for the numerical IK solver.
The DH table and joint limits are read from the arm’s firmware at connect time (get_dh_params() and XCONF.Robot.JOINT_LIMITS), not hard-coded. kinematics.py carries its own copy of the limits for use in simulation.
Lite6Arm also publishes its joint angles over LCM, so the MuJoCo viewer can mirror the real arm’s pose.
lite6arm_sim.py: the simulated arm
SimArm matches Lite6Arm method for method, but instead of the SDK it exchanges LCM messages with the mujoco-sim bridge on three channels: state (bridge → GUI), control (GUI → bridge) and display (GUI → bridge, viewer overlays only). Its three control modes mirror the firmware modes above: position, joint velocity, and a Cartesian twist whose velocity IK is solved inside the bridge at 1 kHz, exactly as the real arm’s firmware would.
LCM is configured with ttl=0, so traffic stays on the local machine and stations do not interfere with each other.
SimArm gains two things hardware cannot do: set_ghost() draws a translucent preview arm at an IK solution, and set_fk_display() overlays frame axes. Both are no-ops on Lite6Arm so the GUI can call them unconditionally.
camera.py: perception
The Camera class owns the RealSense pipeline and holds the latest frames; VideoThread drives it. Stream resolutions and the camera’s own specifications are on the Hardware page; what camera.py adds on top is:
| Setting | Value |
|---|---|
| Alignment | Depth aligned to color, so (u, v) means the same pixel in both |
| Depth filters | Spatial → temporal → hole-filling |
| AprilTag family | tagStandard41h12, 25 mm tags |
| Tag detection rate | Every 6th frame (~5 Hz) |
| Visual preset | Short Range, to lower the depth floor near the arm |
Intrinsics come from the camera, not from a calibration you run. Camera.__init__ reads the factory intrinsics off the color stream profile and builds intrinsic_matrix from fx, fy, ppx, ppy. What you implement is the extrinsic calibration: where the camera sits relative to the robot. See the Camera Guide for measuring the intrinsics yourself and checking them against the factory values.
TAG_WORLD_POINTS maps the four workspace tag IDs to their known positions in the robot frame. Adjust it to match your physical station.
The GUI offers four views of the same scene, RGB, Depth, Tags and Workspace, selected by radio buttons. Hovering the video reports the pixel, the depth in mm, and the world coordinate once calibration succeeds.
state_machine.py: behavior
A dictionary dispatch from a state name to a handler, polled at 20 Hz. set_next_state(name) is what the GUI buttons call.
| State | Triggered by | Status |
|---|---|---|
idle | default | Provided |
initial_pose | Initial Pose button | Provided |
sleep_arm | Sleep Arm button | Provided |
estop | STOP button | Provided |
direct_control | Direct Control toggle | Provided |
calibrate | Calibrate button | Calls your camera code |
add_waypoint | Add Waypoint button | Student lab |
clear_waypoints | Clear All button | Student lab |
playback_waypoints | Playback Waypoints button | Student lab |
pick_place | Click Pick & Place toggle | Student lab |
kinematics.py: the math
Pure functions with no dependency on the arm or the GUI, which is what makes them testable on their own:
python src/kinematics.py
It provides the constants JOINT_LIMITS and Q_DEFAULT, and the signatures. Both FK methods are stubbed; you implement either the DH method or the PoX method, not both. IK_numerical is a bounded Gauss-Newton least-squares solve over your FK, so it only works once FK does.
The control station GUI
| Panel | Contents |
|---|---|
| Video | RGB / Depth / Tags / Workspace views, with pixel, depth and world readouts under the image |
| IK Solver | X/Y/Z/Roll/Pitch/Yaw inputs, two result columns, Calculate / Clear / Go To Pose |
| Cartesian Jog | Six axis pairs, switchable between Base and EE frame |
| Direct Control | Per-joint jog buttons with live angle readouts and limit bars |
| Speed | A single percentage slider scaling every motion command |
| Joint Angles / End Effector | Live readouts |
| Arm Control | Initial Pose, Sleep Arm |
| Gripper Control | Open, Close, Stop |
| Waypoint Recorder | Add Waypoint, Clear All, Playback Waypoints |
| Camera | Calibrate |
| Mode Select | Manual Mode and Click Pick & Place toggles |
| STOP | Full-width emergency stop |
The IK panel deliberately shows two solvers side by side: column B is always your numerical solver, and column A is your closed-form IK_geometric in simulation or the vendor SDK solver on hardware. Joint values outside the limits are flagged, and Go To Pose prefers column A, falling back to column B when A is unreachable.
Click Sleep Arm before closing the GUI. It returns the arm home and then cuts motor power. Closing the window alone leaves the arm energized where it stands.
What you implement
| File | Function | What it does |
|---|---|---|
kinematics.py | DH_STD | Fill in the DH table for the Lite 6 |
get_transform_from_dh | One DH row → 4×4 transform | |
FK_dh | Chain the per-joint transforms | |
M, S_list, to_s_matrix, FK_pox | The PoX alternative to the DH route | |
get_pose_from_T | 4×4 transform → [x, y, z, roll, pitch, yaw] | |
IK_geometric | Closed-form inverse kinematics | |
IK_numerical | Bounded Gauss-Newton inverse kinematics | |
camera.py | TAG_WORLD_POINTS | Tag positions for your station |
draw_tags_in_rgb_image | Annotate detections on the Tags view | |
estimate_extrinsics_from_tags | AprilTags + solvePnP → camera-to-world transform | |
depth_to_camera_point | Pixel + depth → 3D point in the camera frame | |
camera_to_world | Camera frame → world frame | |
image_to_world | Pixel → world XYZ, using live depth | |
workspace_pixel_to_image, _update_workspace_transform, update_workspace_frame | The top-down workspace view homography | |
state_machine.py | add_waypoint, clear_waypoints, playback_waypoints | Teach-and-repeat |
pick_place | Click an object in the video feed and pick it up |
A waypoint stores joint angles together with the gripper state, so two consecutive waypoints can share a pose and differ only in whether the gripper is open. Playback moves the joints first, then applies the gripper state.
Running pieces on their own
Each module has a __main__ block, which is the fastest way to isolate a problem:
python src/kinematics.py    # self-test: identity check on your DH transform
python src/camera.py        # opens RGB, Depth, Tags and Workspace windows
python src/lite6arm.py      # connects, homes, prints joint angles and FK, sleeps
Environment notes
Everything imports from the env550lab conda environment, and a surprising number of failures trace back to that:
opencv-python-headless, neveropencv-python. The normal build bundles its own Qt5, which fights PyQt5 inside the same process. The headless build is identical for image processing;cv2.imshowis unavailable, and all display goes through PyQt5.pyrealsense2is built from source, not installed from the environment file, and lands in/usr/local/OFF/, reached through aPYTHONPATHentry in~/.bashrc. Ifimport pyrealsense2fails in a new terminal,source ~/.bashrcfirst.- The environment is pinned to Python 3.10, because the RealSense binding is compiled against one specific interpreter version.
If an import fails, check the prompt for (env550lab) before anything else. See Linux Command Line Tools.
Reference
- Lite 6 Arm & SDK Guide: the SDK calls behind
lite6arm.py - Camera Guide: RealSense Viewer and intrinsic calibration
README.mdandinstall_scripts/README.mdin the repo: install rationale and failure modessrc/mujoco_sim/README.md: the simulation bridge